TinkerCad Training

|
|
| welcome_to_tinkercad...fill_in_the_blank_form...updated.docx |
Working with Fill In The Blank documents on a Chromebook
If you are working on a pc computer, either laptop or desk model, and you open one of my fill in the blank forms ... a simple single click will open the fill in the blank space, whether its a click to fill or drag to fill.
If your assignment is downloaded to a chromebook, however, the process is a bit more complicated. When you download a fill in the blank form, whether it is a click to fill or a drag to highlight, and are expected to fill in the blank, use a triple click technique to open the blank, fill in the correct answer and move on.
Do not save, as this will change the fill in the blank to a google doc file. Instead, download the completed document as a Word docx file and store it in your Google Drive account/folder. You might want to create a CTE folder in the Google Drive so as not to lose "stuff".
You can then Submit Your Work as you would normally do to the Submitting Your Work page on the class website, browsing and accessing your completed Word docx file in your Google Drive.
I've tried this procedure on my new HP Chromebook and it works perfectly. Hope this helps...
Robert Bell
[email protected]
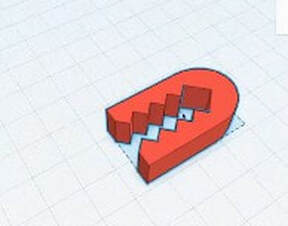
TinkerCad Assignment ... Drawing the Red Block
TinkerCad Links
Each of the buttons below is a link to the TinkerCad app. Each period has their own button and their own unique link.
After you click on the link, you will be taken to a TinkerCad page which will ask you for a nickname/password to log in to your TinkerCad account. Every student has their own account. If you click on the link to another period class, you will be taken to TinkerCad...but your nickname/password won't work. It will only work in your period.
Your password is simple. Lets look at an example for Sarah Student. Miss Students ID # is 2651234. Her nickname/password will appear as (all lower case letters) student,sarah2651. Her last name is first, and then a comma, and then her first name, and then the first 4 numbers of her ID.
Getting in, then, is pretty straightforward.
Create a Bag Clip on TinkerCad
|
|
| designing_the_bag_clip.docx |
Complete the TinkerCad Bag Clip
Download the file below to see step-by-step instructions for completing your TinkerCad Bag Clip project.
| tinkercad_bag_clip.pdf |
Tinkercad Basic Keychain 1
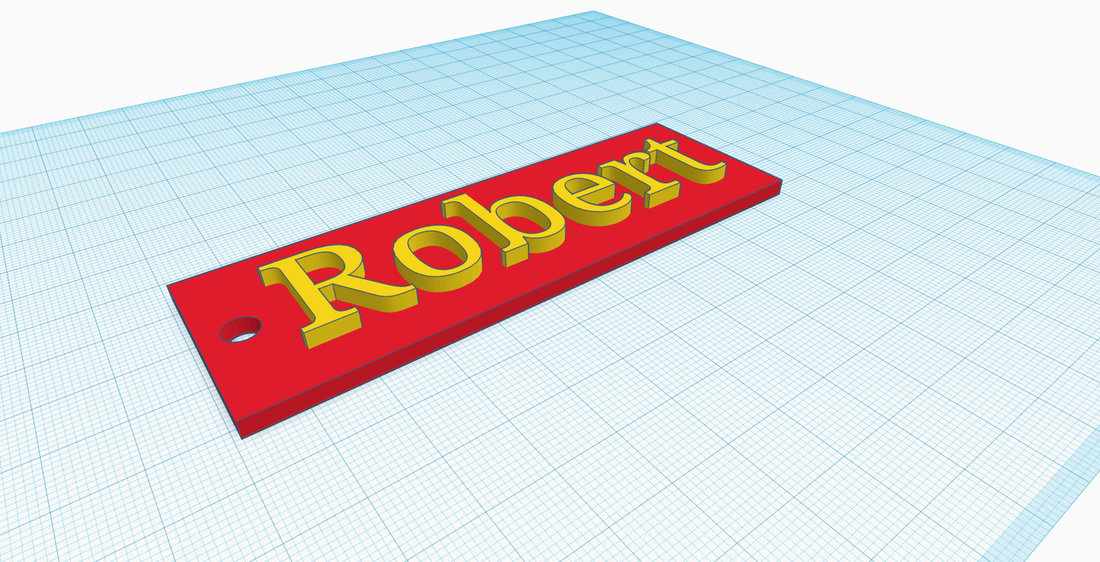
Several students have already turned work in this morning and I see that we need some parameters for the TinkerCad Keychain #1 project.
1. Ok, first of all, use your first name.
2. Next, make the baseplate for the text as long as necessary for the name...plus one grid square extra at the left end for the keychain hole.
3. The baseplate should be 3mm thick.
3. Add your name text in whatever format you wish.
4. The text should protrude (stick up) 3mm from the top of the keychain baseplate.
5. The text should not be the same color as the baseplate.
6. The text should be aligned in the center of the width of the baseplate.
7. The hole for the keychain should be 6mm in diameter.
8. The hole for the keychain should be aligned in the center of the width of the baseplate.
9. Only the baseplate and the hole should be grouped as the text will be a different color.
10. When sharing the design, turn and rotate the design so that the picture is presenting as the picture in the example.
Finally, you will of course need to use contrasting colors for the keychain baseplate and the raised text on the face. You may use colors of your own choice for your keychain. Please, use something besides red and yellow.
TinkerCad Snowflakes
Monday, May 18
Good Morning,
Today begins the last assignment for our CTE-STEM class for this year. This final assignment will have one TinkerCad snowflake to copy from this week's video plus +++ another TinkerCad snowflake of your own design. They will both be turned in together on the same png file. So watch the video, and do you best on both snowflakes. (yes, they have to be different)